FIX YOUR HIP DIPS!
One of the most common questions that I get is regarding “hip dips” also known as “violin hips.” Some women have more pronounced dips while others’ are more subtle.
Hip dips are naturally occurring, inward curves below your hips, above your thighs. They are caused by the shape of your pelvis. Although, not everyone will have noticeable hip dips, if reduced to a skeleton, all of us would have an indentation where the hip bone meets the top of the thigh. Hip dips are a normal part of your body’s structure.
A common misconception is that hip dips – or a lack of hip dips – are a sign of how healthy you are. However, as already ascertained, hip dips are associated with the shape of your bones – something which cannot be changed.
And, because your pelvis is unique and will look completely different to those of all the other women at the squat rack; so, too, will your hip dips.
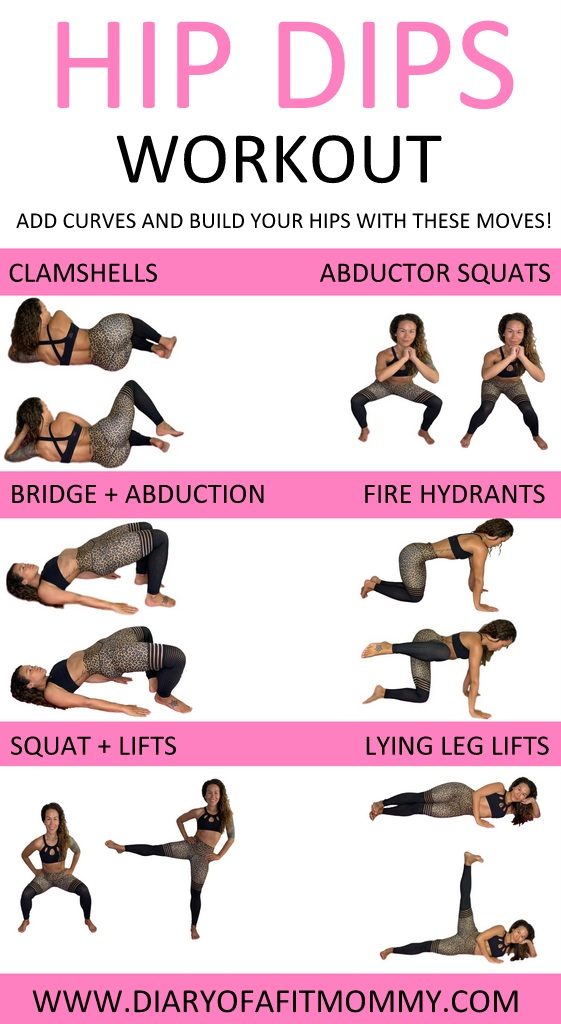
Little can be done to change your bone structure, so what can you do? As shown in my above YouTube video, I explain and share with you 6 exercises that can help fill in the hip dips-to an extent!
By strengthening the gluteus medius, you can grow your hips slightly in order to appear a little more proportionate. Again-there is nothing wrong with hip dips, but if you would like to focus on this area, here is the workout you need to be doing!
HIP DIPS WORKOUT
Complete each move for 10 repetitions per exercise followed with 3 sets of each. You should be doing each move for a total of 30 times to complete this workout.
CLAMSHELLS:
- Lie on your right side with your feet and hips stacked, your knees bent 90 degrees, and your head resting on your right arm.
- Draw your knees in toward your body until your feet are in line with your butt. Place your left hand on your left hip to ensure it doesn’t tilt backward. This is your starting position.
- Keeping your abs engaged and your feet together, raise your left knee as far as you can without rotating your hip or lifting your right knee off the floor.
- Hold for 1 second, squeezing your glutes at the top of the move, before slowly lowering your left knee to the starting position.
- Continue for a total of 10 reps, then repeat on the other side.
ABDUCTOR SQUATS:
- Start in a seated position with knees bent and feet about shoulder width apart.
- Using the upper glutes, push your knees outwards and away from each other.
- Hold for a moment in the abducted position, before returning to the start position. This is one rep.
- Repeat the desired number of reps and sets.
BRIDGE + ABDUCTION:
- Lay on your back with your knees propped up and bent.
- Slowly raise your glutes off of the ground and pause for one second.
- At the peak of this move, abduct or open your legs so that your knees move away from each other.
- Adduct or bring your knees back together and lower your glutes back to the floor.
- Repeat.
SIDE LYING LEG LIFT:
- Start on your side with your legs extended, flexing both feet. Make sure your bottom leg stays extended.
- Lift your top leg up and raise towards the ceiling. Pause for one second and lower back down.
- Repeat for 10 reps and switch legs.
FIRE HYDRANTS:
- Position yourself on your hands and knees on the ground. This will be your starting position.
- Keeping the knee in a bent position, abduct the femur, moving your knee away from the midline of the body.
- Pause at the top of the motion, and then slowly return to the starting position.
- Perform this slowly for a number of repetitions, and repeat on the other side.
SQUAT + LIFTS:
- Start in a standing position with both feet together, back and spine in a neutral position and core tight.
- Squat downward and as you rise upward, lift your left leg outward.
- Slowly lower back to the starting position and back into a squat.
- Complete the desired number of reps, then switch sides and repeat for the other leg.

Your trainer and friend,


