

FREE Build a Better Booty Bootcamp Workout
Hi ladies!
Welcome to the Fit Mommy Booty Boot Camp! You are here because you obviously want to build a better booty, right? Well, you have come to the right place!

If you are like me, then pregnancy & breastfeeding has left you with nothing left behind down there. Or, if your mama didn’t give you a booty, it is okay-we can beat genetics and build one for you!
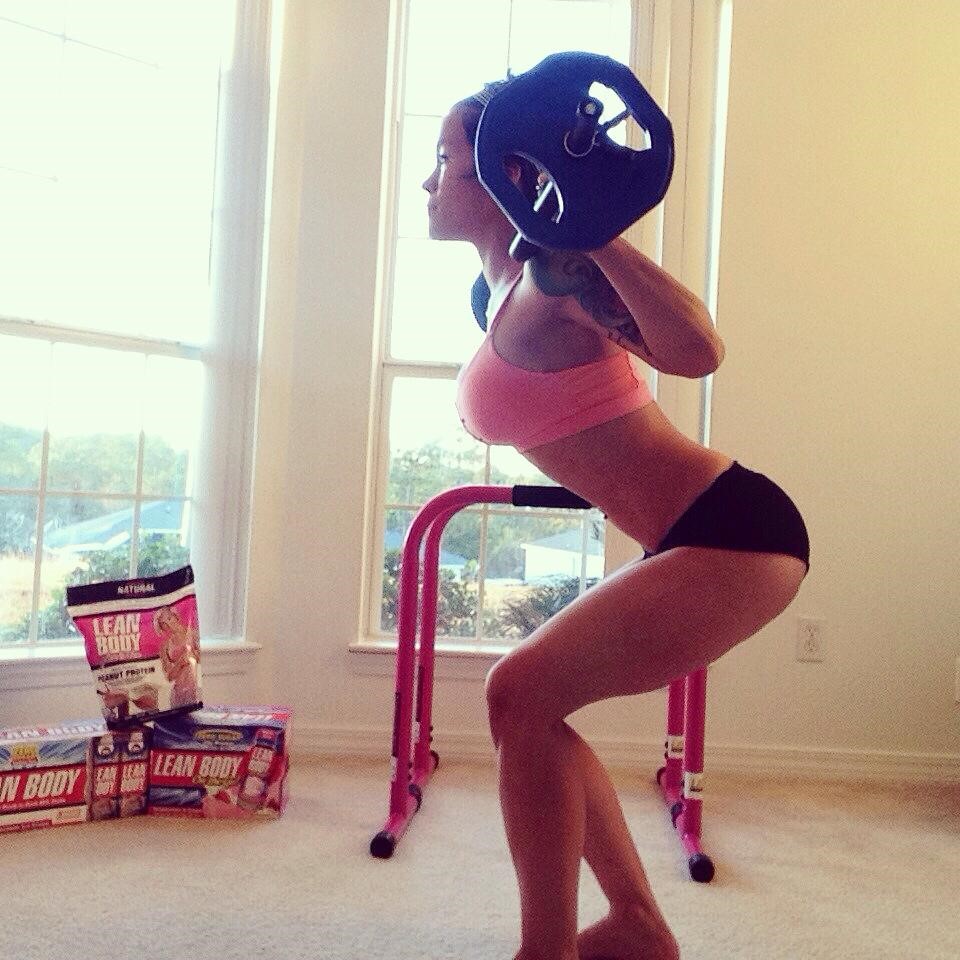
It took me two months to get from the picture on the left to the picture on the right. But, I got there!

In my mind, I still have a ways to go, but I am not giving up. You can do it, too.
I have struggled with a less than stellar derriere for most of my life. It just seems that my hips, buttocks, and thighs were the HARDEST areas to shape up. Becoming pregnant and then nursing did not help the situation (thanks, hormones!), but I decided that something had to be done. For the last two months, I have committed myself to building the perfect booty. And after about 8 weeks, I finally got it! It is still a work in progress, but I am keeping on, keeping on.
I will warn you-it will not be easy. It will take a while to see those results. It will be hard. You might even want to give up or skip workouts, but don’t! Eventually, you will get that booty that you have wanted for so long. I know, I did!
The Fundamentals of a Booty
When it comes to building a booty, you must understand the anatomy of the buttocks and why and how the muscles do what they do. Learning the parts of your own booty will help you lots in your journey to getting the butt of your dreams.

Did you know that your butt was composed of 3 muscles?
The glutes or buttock muscles are comprised of 3 main components:
- Gluteus medius: this muscle is located on the outer surface of your pelvic region. This muscle comprises part of your “hips” and is partially covered by the gluteus maximus muscle. This muscle works to provide rotation of the thigh outward from the center of the body to help you walk.
- Gluteus maximus: the largest and the most superficial muscle of the bunch. This is the muscle that you can really see in nice, toned butts. The gluteus maximus muscle is responsible for movement of the hip and thigh.
- Gluteus minimus: this muscle is the smallest of the bunch, located beneath the Gluteus medius. Just like the Gluteus medius, this muscle is also known as part of your “hip.” The minimus stabilizes our hips, rotates our thigh inward, and also abducts the hips.
Whenever your muscles aren’t worked, they lose their “tone.” This makes your butt look flat. Such as mine did below:
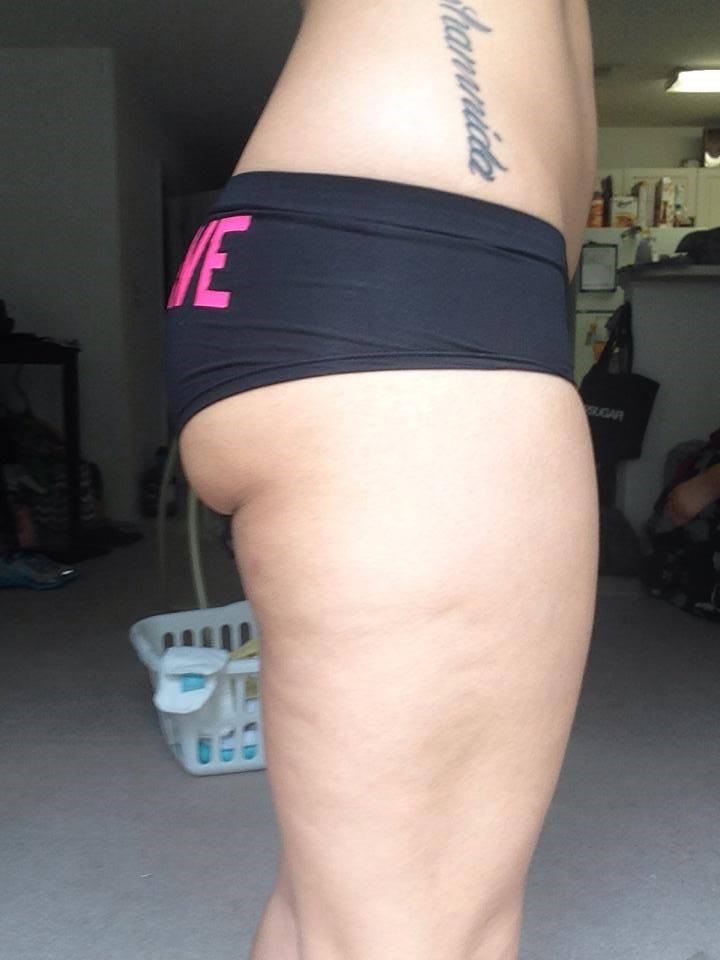
Having little to no muscle tone also leaves room for developing cellulite! Cellulite and I are no strangers-I have been battling it all throughout my pregnancy and postpartum journeys. I am finally to the point where I have it controlled!
But, let’s talk about cellulite for a moment.
Cellulite is defined as persistent subcutaneous fat causing dimpling of the skin that resembles an appearance of that of an orange peel. It frequently occurs more so in women than men due to the fact that women carry more body fat than men. Cellulite occurs most frequently in the hip, thigh, and buttock region; however it can occur on your upper extremities as well. Cellulite is simply a sign that your body is being polluted!
What are the best things to eat to prevent or decrease cellulite? Here are a few things that help a lot!
- Green tea-high in antioxidants, this is actually a natural fat burner and detoxifier. Remember, cellulite is a buildup of toxins. Drinking green tea helps to flush these toxins away.
- Water-this is a no brainer. A cause of cellulite as mentioned before was dehydration. Add a little lemon to your water like I do, to aid in detoxification.
- Apple Cider Vinegar-this stuff is a miracle! I drink a couple of tablespoons every morning. Not only does it boost your energy levels, it relieves water retention in your tummy, buttocks, and thighs. Another natural detoxifier.
- Avoid added or extra salt! Salt loves to cling to water, and retain water in your most unflattering places. Instead, try using Mrs Dash salt free seasoning as an alternative-if you are a big salt lover! Salt also dries you out, making the appearance of cellulite even worse.
- Berries-filled with antioxidants!
- Salmon-the Omega 3’s and good fats in fish can actually rev up your metabolism, helping to burn that stored fat, which in turn, smoothes things out.
- Cayenne or Cinnamon-sprinkle a little of these spices on your food! These are known to speed up your metabolism.
- Whole grains-packed with fiber, whole grains will not only keep you full longer, but keeps your insulin levels at bay. Refined carbs or “white flours” actually send your insulin levels soaring after you eat them, telling your body to store fat, rather than burn it! That’s why we avoid refined carbs and stick to the good ole whole grains.
- Grapefruit-The wonder breakfast for most! Its enzymes and bioflavonoids help improve circulation. It aids in the flushing of fat cells, particularly the dark brown “stubborn” fat.
- Eggs-another wonder breakfast and a favorite of mine! Some might be concerned about cholesterol, but the amount of vitamins and minerals, not to mention good fats and high protein levels, outweigh the cholesterol con.
Let me get one thing straight. There is no ONE workout that will target ONE specific problem area-especially when it comes to cellulite since the reduction of cellulite is an all-over type of process.
The best exercises to combat cellulite are the ones that get your heart pumping-CARDIO!
- Running
- Jogging
- Walking
- Swimming
- Sports
- Dancing
- Hiking
- HIIT
- Bike Riding
- Pilates
- Stairs
- Rowing
- Kickboxing
- Aerobics
However, you do need strength training to gain muscle so that the appearance of cellulite virtually disappears. That’s why most personal trainers suggest the cardio/weight mix since you need cardio to cut the fat. The strength training builds the muscle that helps to eat fat while raising your metabolism. It’s been proven that muscle burns 3 times more calories than fat!
Best basic moves to combat cellulite are (and it’s an added bonus to add some weights):
- Squats
- Burpees
- Romanian Deadlifts
- Single leg hip extensions
- Lunges
When you work those muscles and they grow, you see the definition below the skin. Those 3 individual gluteal muscles will start to appear. And as you begin working out and eating right to build up your muscle or “tone up” as many like to say, your cellulite will start to disappear before your eyes. But… it takes time!
The 3 Principles of Transforming Your Butt
Now that we have discussed which muscles are what, let’s move on!
To build your glutes, you will need to primarily do 3 things:
- Eat clean. Stay away from junk food and processed crap.
- Lift heavy with fewer reps. Sorry, but the 5 lb. dumbbells and 50 repetitions won’t cut it for this.
- Stretch it out. Stretching is essential to any workout program. Stretching prevents injury and allows for maximum muscle building.
To understand how these 3 principles work in perfect harmony together, we first must break each down to learn more in depth.
Let’s begin with diet!
I am sure that you have heard that you cannot out train a bad diet. Meaning, there’s no amount of exercise in this world that can make up for what a bad diet does to your health-and your body. Diet is everything, people!! Yet, dieting the right way is what people have an issue with.
First of all, it shouldn’t be a spur of the moment, inconsistent decision-your “diet” should be a lifestyle change to become a healthier person with healthier habits. It won’t happen overnight-a good, balanced diet takes months to perfect. It is honestly a self-taught, will powered kind of thing to learn to do. The main thing that I have learned is that you have got to love your body (and yourself) more than those McDonalds French fries or more than that double cheeseburger.
Four years ago, I lived off of Chik-fil-a kids meals because I was a broke nursing student and because I craved junk food. I was also the heaviest I had ever been, depressed, with little energy to live on.
I made the decision to get fit and to lose 45 lbs. after becoming sick with how I felt and how my body looked. Instead of saying, “I will start my diet Monday” like I usually did or trying another fad diet, I educated myself and motivated myself to get to work. I threw away all of the junk food in my pantry (money wasted… sigh) and I made a grocery list with clean foods. I went shopping and started a new life for myself.
When you start eating clean, amazing things happen:
- Your cellulite disappears or softens.
- You feel more energy.
- You sleep better.
- Your hormones are more regulated.
- You lose weight and tone up.
- Your clothes fit better.
- The list goes on!!!
In order to build a butt (or any type of muscle or toned physique), junk food will NOT cut it.
But, “what’s clean eating?”
There is honestly no right definition to this, but I will tell you MINE.
Clean eating is:
- Unrefined and unprocessed. You want the food in its most natural state.
- Minimal ingredients-the less on the list, the better.
- No chemicals that you cannot pronounce.
- Not fast food.
- Food you will usually have to prepare yourself (sorry, it is part of the sacrifice).
- Fueling your body with the BEST fuel.
- Organic, if possible.
- No additives, preservatives, etc.
- Nixing your sugar habit.
- Including lean protein in every meal.
- Avoiding or minimizing bad fats, sugars, and salt.
I know what you are thinking: Do I do cheat meals? On occasion, I will have a cheat meal such as vacation or maybe even a holiday. Usually, I don’t, though.
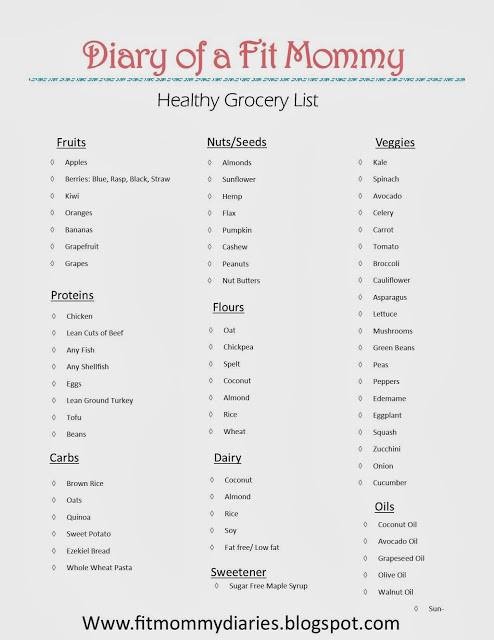
Here is a clean eating grocery list to help point you in the right direction:
In order to build your booty, you need to build upon those three muscles that we talked about earlier. This means, you need PROTEIN! Aim for protein at every meal. After all, protein is the building blocks of muscle. You cannot create new muscle without it!
Here is a sample of my daily diet plan when I am building muscle:
Meal 1: 6am
- 1 cup coffee with 1 tbsp. creamer
- 3 boiled egg whites
- 1 piece Ezekiel bread toast
- 1/2 cup of berries
Meal 2: 9am
- 2 scoops Labrada Lean Body for Her Peanut Protein
- 1/2 cup almond milk
OR
- 2 tbsp. all natural peanut butter
- 1 small apple
Meal 3: 12pm
- 1 baked chicken breast, skinless and seasoned
- Baked asparagus
- 1 small sweet potato
Meal 4: 3pm
- 2 filets of tilapia
- 2 cups spinach
- 1/2 cup brown rice
Meal 5: 6pm
- Sautéed whole green beans
- 1 filet salmon
- Roasted veggies
Meal 6: 9pm
- 2 scoops Casein Protein
- 1/2 cup water
OR
- ½ cup cottage cheese
- 5 strawberries
As you can see from my daily diet plan, I eat lots of protein. If you are an active female looking to tone up and put on some muscle, you need to match one gram of protein to one pound of your body weight.
Currently, I weigh 115lbs so this means that I should aim for at least 115 grams of protein daily! Protein shakes make this possible-that is why I love them so much!
Please note-the amount of calories that you need to consume will vary based on your age, weight, height, and activity level. To figure out how many calories you will need to put on muscle to build your butt, please visit a dietician or use this calculator here. I will tell you this: you will need to eat enough calories in order to build muscle down below. Do not be afraid, ladies! Calories are GOOD. Just make sure that they are quality calories, not junk food.
Some folks will say that a ton of protein will hurt your kidneys-this is true IF you have a kidney functioning issue. This is why you always check with your doctor before beginning ANY diet plan. Also, make sure you drink enough water while increasing your protein intake.
“How much water should I be drinking?” Well, this varies from person to person, but most experts agree that 8 glasses a day is perfect. Personally, I count my water intake in ounces and aim for at least half my body weight in ounces of water. I weigh 115 lbs. so I drink at least 55.5 ounces of water a day!
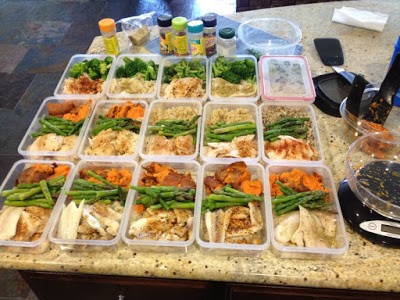
You might find it hard to plan your meals but to get into tip top shape, planning is everything. I recommend meal prepping which is basically cooking a large batch of food in advance. Food prepping is one of the most helpful ways that I have been able to stay on track with my clean eating. It makes life a whole lot easier during the week when there is laundry to wash, kids to feed, and work to be done. You can prep most foods & snacks that generally won’t spoil within a few days. My personal favorite food prep meal to make is grilled balsamic chicken with asparagus and sweet potato mash. My favorite snacks to prepare are boiled eggs, protein bars, and fruit. Over time, you will develop your “go-to” meal and what works best for you during the week.
Here are 5 tips to help you get started on the road to food prepping for the week!
- Pick a meal prep day. My meal prep days are usually Sundays because of the amount of down time I have to complete it.
- Set aside at least 2 hours-or more. The amount of time spent food prepping is ultimately up to you. I typically spend about 3 hours prepping my meals, but I know some others who spend less or even more with their meals. It all depends on what you are making.
- Make a healthy grocery shopping list. This can be time consuming because this is the planning part of your meal prep. I like to jot down ideas on a piece of paper throughout the week or look on Pinterest for some ideas of what to make if I am craving something other than the usual chicken-broccoli-brown rice meal. Make sure you plan enough to last you the week-and don’t forget snacks! Also, do not forget your list!
- Go grocery shopping! Once you have your list made, you can then proceed to the store to get your goods! Sometimes, what I purchase depends on what is on sale so I can save a buck or two. Usually, I am out within an hour with everything that I need.
- Prep & cook. Once home, you can begin right away! Boil the rice, wash & chop the produce, cook the chicken, etc.-whatever you have to do. Set aside. Arrange meals in the container of your choice and stash in the refrigerator for the week.
As a bonus, here are a few booty-building snack recipes for you to try!
Avocado Deviled Eggs
Ingredients:
- 6 hard-boiled eggs, peeled and cut lengthwise
- 1 ripe avocado, pitted and peeled
- 1 tbsp. fresh lime juice
- 1/4 tsp salt
- 1/4 tsp onion powder
- Paprika
Instructions:
- Remove egg yolks from the halved eggs and place in a small bowl. Add the ripe avocado, lime juice, salt, onion powder, garlic and cilantro.
- Use a fork to mash the guacamole mixture until smooth.
- Spoon (or use a frosting bag to pipe) the mixture into the halved eggs. Sprinkle with a dash of smoked paprika.
- Keep stored in an airtight container for up to 2 days
Peanut Butter Protein Balls
Ingredients:
- 2 cups natural peanut butter, crunchy
- 1/2 cup agave nectar
- 2 scoops your favorite protein powder (I use Lean Body for Her Whey), vanilla flavor
- Water, as needed
Directions:
- Mix peanut butter, agave nectar, protein powder, and water in a large bowl.
- Roll mixture into balls (approx.1 tablespoon per ball) and place in a dish, then refrigerate for 30-45 minutes.
Hummus-Cucumber Cups
Ingredients:
- 4 large cucumbers
- Melon baller or scooper
- 1 large container Sabra Hummus (whatever variation you like, I love the spicy pepper)
Directions:
- Wash each cucumber and cut off the ends so that they are not rounded, but flat.
- Next, cut each cucumber into 5-6 one inch sections.
- Take a melon baller or scooper, and scoop out the flesh or middle section of the cucumber. Don’t dig too deep so that you make a hole! You want each section or slice to have a bottom to it.
- Lastly, scoop hummus into each slice and pile on top.
Pineapple Whip
Ingredients
- 1 whole pineapple (cut and peeled), cut into chunks and frozen
- 1 cup Silk coconut milk
- 2 tbsp. honey
Directions
- Combine frozen pineapple chunks, milk, and honey into a blender or food processor, the higher the speed the better.
- Pour into a bowl and enjoy!
Mango Fruit Leather
Ingredients
- 3 mangoes, fresh, peeled, and chopped
- 2 tbsp. honey
Directions
- Line a baking sheet with wax paper or parchment paper.
- Place mango chunks in a food processor and puree.
- Spread puree onto the baking sheet and bake at 200 degrees for 4 hours or until the mango puree is dry to touch.
- Cut, peel, and enjoy!
Pre & Post Workout Snacks
When working out, you need the proper fuel. Fuel is everything, after all. It can also make or break your journey to achieving your best butt ever. There are certain things to eat prior to a workout and certain foods to eat afterwards.
Let’s start with pre-workout snacks. You may have heard about the great big debate on whether or not its a good idea to eat before a workout. Here are some of the benefits to having a little pre-workout snack: less fatigue, more energy, and decrease chance your blood sugar will be low enough to make you faint!
Instead of aiming for a full meal right before your workout, try these snacks below. They are designed to give you the energy or carbs you need to make your workout count!
Pre Workout Snacks
- Dried fruits
- Fresh Fruits
- Oatmeal
- Quinoa
- Rice Cakes with Nut Butter
- Banana with Almond Butter
- Smoothie
- Whole grain cereal with a cup of almond milk
- Granola or fruit & nut bar such as KIND or Larabar
Post workout snacks are just as important. After all that work that you have just put your body through, it needs some refueling to recover. Think of your body like a tank filled with gas. That gas or pre-workout snacks fuels you up for that intense workout. After the workout, you feel worn out! Your body is simply low on fuel or gas and needs a snack!
After a workout, your body craves more protein to nourish those muscles that have just been put to work. Protein not only helps the muscles recover, but they encourage and facilitate new muscle growth! You don’t just need protein post-workout though-you also need some carbs for more energy! Here are a few great classic post-workout snacks that have been tried & true.
Post Workout Snacks
- Chocolate Milk
- Boiled Eggs
- Protein Shakes
- Protein Bars
- Cottage Cheese with Berries
- Greek Yogurt with Berries
- Peanut Butter on Wheat Toast
- Hummus with Baby Carrots
- Cheese & Whole Grain Crackers
- Nuts
Next time you fuel up for a workout, think about what you are putting into your body and whether or not it can help or hinder your routine!
Now, that we have established diet basics, let’s talk lifting.
Women are so afraid to lift heavy (or lift at all) in the event that they will magically grow a penis and look like a man. THIS WON’T HAPPEN! We, as women, do not have the muscular or hormonal ability to bulk up like men do.
I will go ahead and tell you that you will need to lift heavy to build a butt. In order to build or create new muscle fibers, you need to push it to its limits. When muscles are used they adapt and change. Changes are dependent on the type of activity and muscle fiber types used, the load exerted on the muscle, and the velocity and duration of the contraction.
“So, why lift heavy?”
Moving a heavier weight with your glutes will stimulate your muscles way more than if you were to lift lighter weights because it triggers more of a response to the workload that you are forcing upon the muscles.
“But wait, I thought lifting lighter weight for more reps was the way to tone an area.”
Negative. The only truth to that is that repeating the stimulus often (many reps) will help to improve tone, but it won’t build any muscle. Think about long distance runners versus sprinters. Long distance runners tend to be slender, yet super toned. Sprinters, on the other hand, are usually a little more muscular in tone, yet they run for much shorter differences. It is amazing what more exertion on our muscles can do in a shorter period of time. Your best bet it to lift heavier weights with shorter reps. Plus, who would argue with fewer reps, anyway??
“So, where do I start?”
Well, not every woman has the ability to go to the gym- I get that! Personally, I do not own a gym membership because, even if I had one, I would not have the time to even think about using it. Instead, I created my own gym at home to work out while my son sleeps or plays.

The biggest benefits of creating your own home gym are:
- saving monthly on gym memberships
- not having to wait on other people at the gym
- the convenience of not having to leave the house
- the ability to workout whenever you want
- the ability to workout with your kids nearby (if you are a mommy)
- privacy and comfort
What’s in my home gym? Here are some great pieces of equipment that I own:
- Kettlebells
- Dumbbells
- Resistance Bands
- Medicine Balls
- Ab Bench
- Plyo Box
- Jump Rope
- Pull Up Bar
- 15 foot rope
- Weighted Vest
- Ab mat
- Dip Station
- Squat Racks
- Foam Mats
- Bumper Plates
- Tractor Tire
- Bench Press Stand
- Space (to run, to do body weight exercises such as jumping jacks, mountain climbers, etc.)
- And the list goes on….
This is just my personal list. Please keep in mind that you do not have to go out and purchase each and every one of these. Some of these can even be made at home or that you can DIY to save money. To each their own!
If you do not have the money to spend on gym equipment for the home or are on a limited budget, I understand. You are probably even wondering if it is possible to build a butt without all that fancy equipment. The answer? Simply, it depends. One thing is for certain-without the proper weights, it will take you LONGER to build muscle. But it IS possible. How? Your body is a weight in itself!
However, I do suggest at least adding the following to your home gym in order to build your butt:
So, what workouts are good for butt building? Here is a list of exercises that are perfect for targeting each of the 3 glute muscles that we talked about earlier!
Gluteus Medius
- Side-Lying Leg Raises
- Side Plank Abduction
- Fire Hydrants
- Leg Scissors
- Inner Thigh Lifts
Gluteus Minimus
- Side plank
- Gluteal Stretch
- Clams
- Hip Adduction
Gluteus Maximus
- Donkey Kicks
- Mountain Climbers
- High Knees
- One Legged Glute Extension
- Squats
- Lunges
- Lunge Kicks
- Deadlifts
- Squat Jumps
- Glute Bridges
Please note: There are tons and tons of great exercises that will work your glutes; however, these have been shown to be the most effective, according to several different studies. These are body weight exercises, but weight can be applied to most of them.
Now, on to the importance of stretching!

The number one reason why we are told to stretch is to warm up our muscles to prevent any injury. However, if you are stretching regularly, not only will it improve your flexibility within your hips and legs to add more value to your workouts, it will also loosen up your entire body. After all, your glute muscles are some of your biggest muscles. If they are tight it puts a strain on your entire body.
Here are three great and notable stretches to try before each and every workout:
Seated Twist
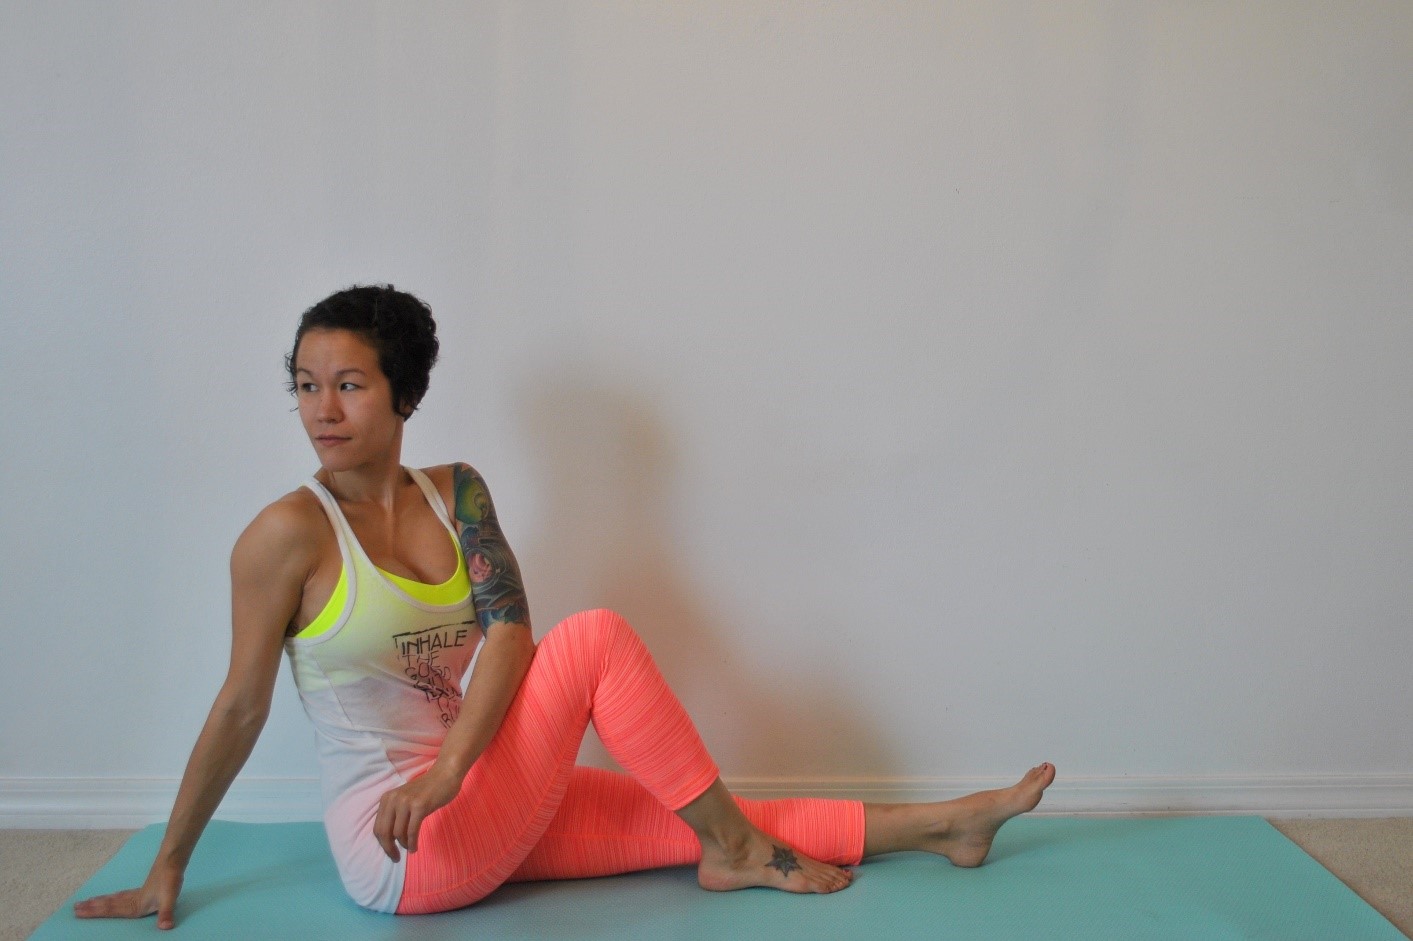
- Sit on the floor with one leg bent and the other straight.
- Turn your body towards the bent knee side until you feel a stretch in your buttocks.
- Hold for 30 seconds.
- Repeat 3 times, 2x daily, or before and after exercise
The Pretzel
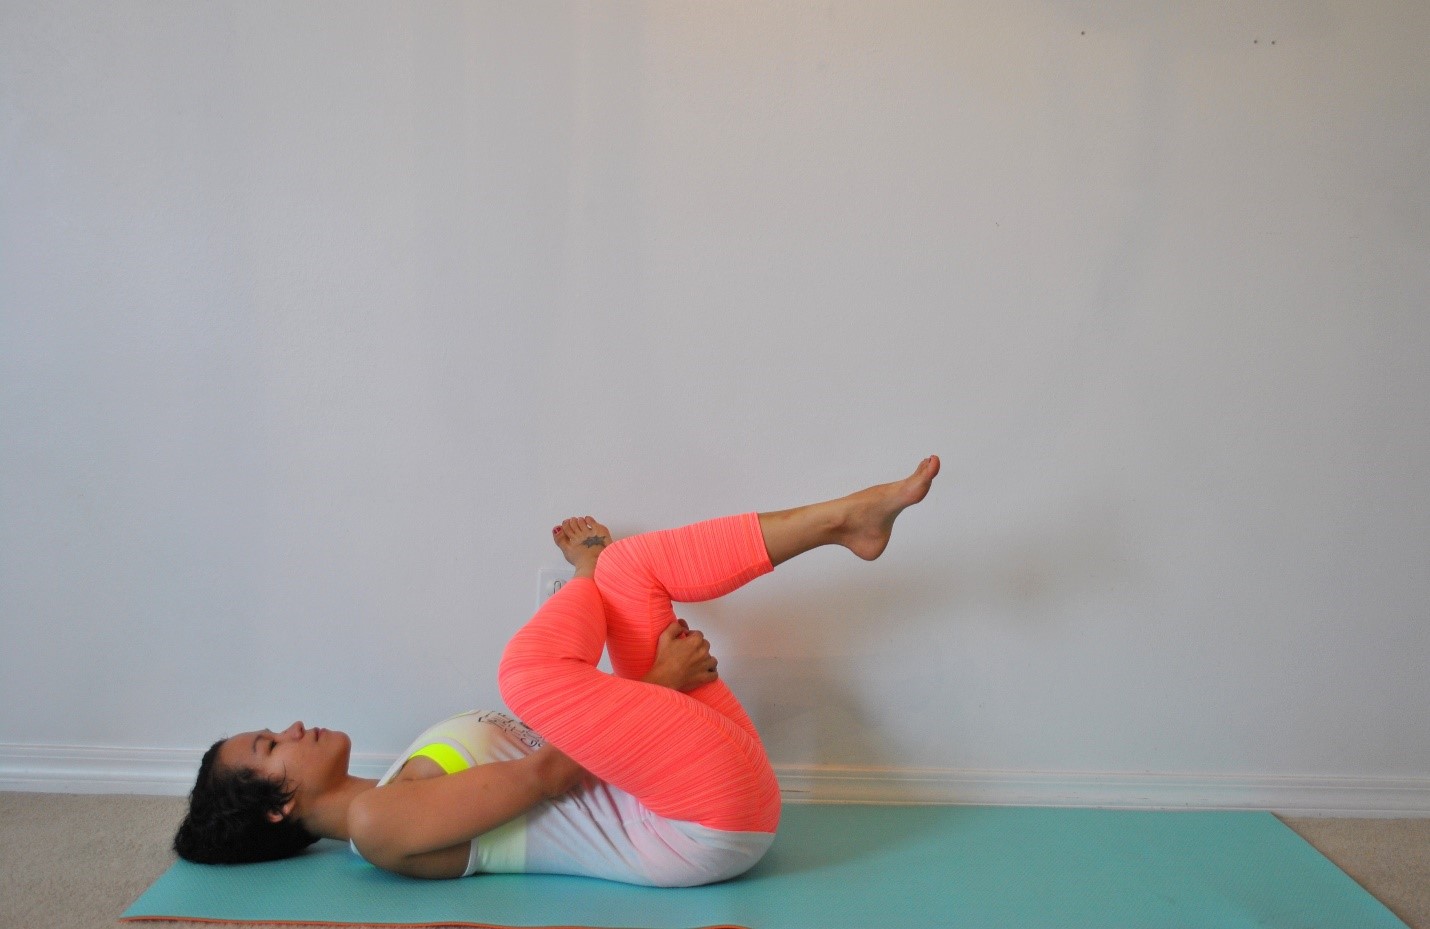
- Lie flat on your back and bend both knees.
- Cross 1 leg over the other so your foot is on the opposite knee.
- Bring both knees towards your chest and gently pull the uncrossed leg towards you until you feel a stretch in your buttock.
- Hold for 30 seconds
- Repeat 3 times, 2x daily, or before and after exercise
Stacked Knee Stretch

- Put your left foot next to your right hip.
- Now put your right leg on top and try to get the foot around to the opposite hip.
- Try to stack your knees on top of each other.
- Lean forward and hold for 30 seconds
- Swap sides and repeat.
Yoga also offers some of the best stretching moves to tone your butt. In every pose, yoga simultaneously stretches and strengthens opposing muscles. I have been doing yoga for over a year now and I absolutely love it.

Here are a few great yoga poses for stretching your glutes:
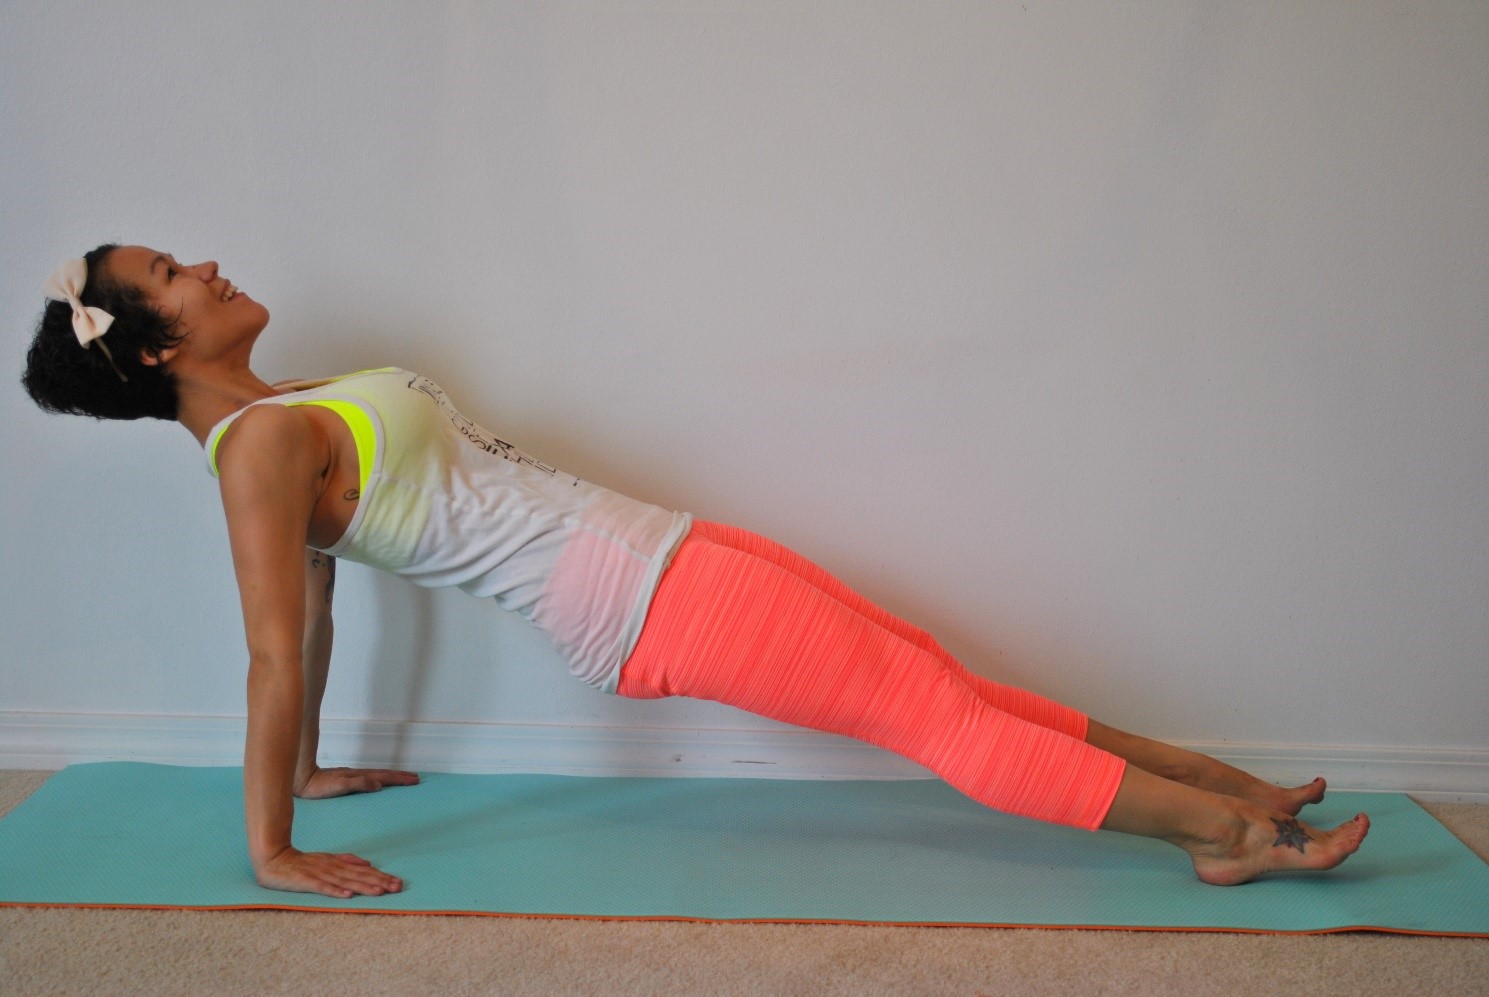
Diver’s Pose
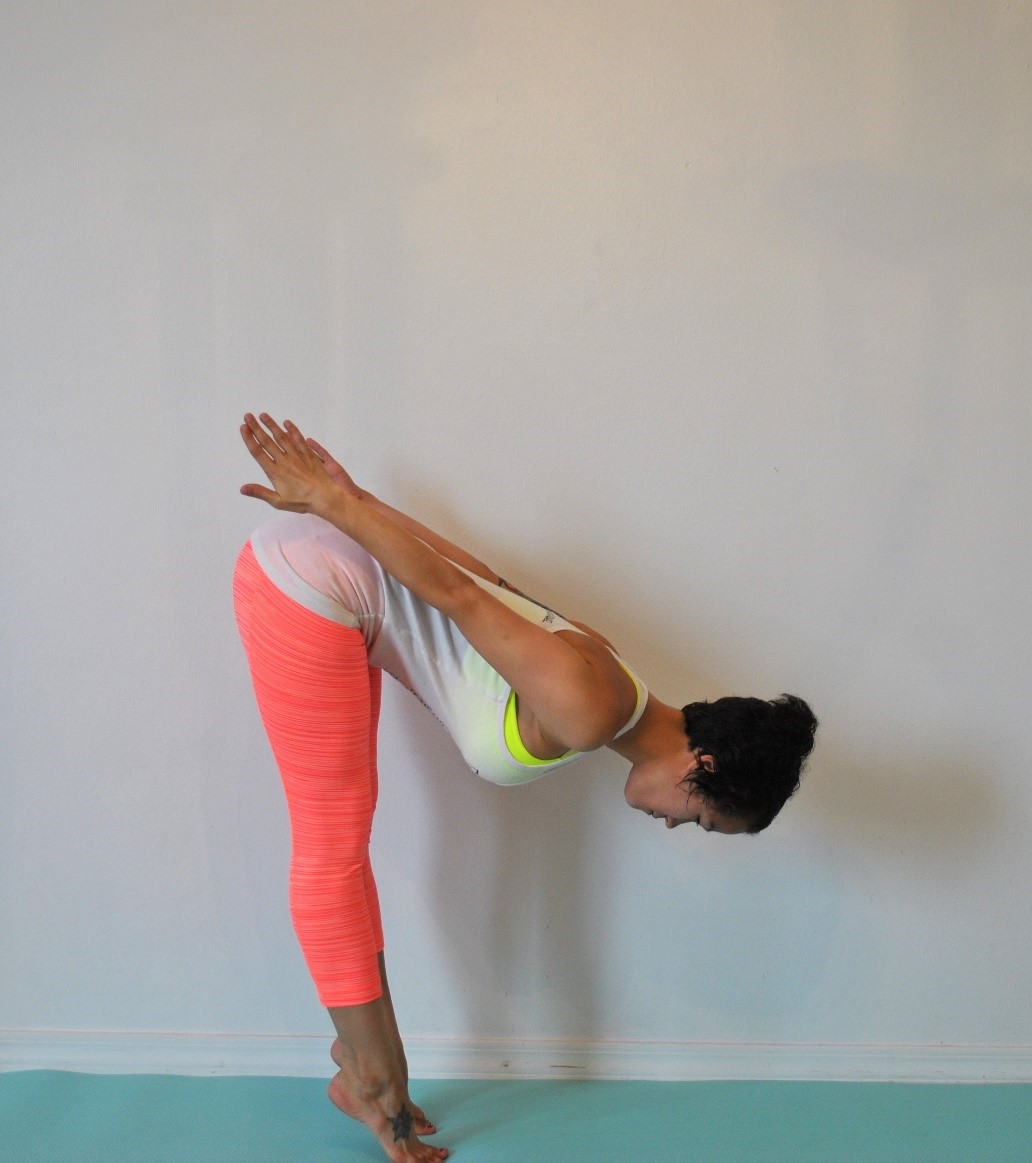
- From standing, put a soft bend in your knees, come high on the balls of your feet, and start to hinge forward from your waist, keeping your arms on either side of your torso.
- Allow your head to dive toward the ground, and stay here for five deep breaths.
Butterfly Stretch

- Sitting tall on your mat, bring the soles of your feet together.
- Interlace your fingers and place them around the toes.
- Sit tall, rolling the shoulders back, and gaze past the end of the nose.
- Lean forward for a deeper stretch, stopping when you start to “feel” the stretch.
- With every inhale, feel your spine growing longer (imagine the crown of your head reaching out in front of you to the wall); with every exhale, allow the body to sink lower (the chest is getting closer to the floor).
Seated Wide Angled Forward Fold

- From butterfly pose, extend your legs out to either side of you at a 90 degree angle.
- If you can straighten the legs, flex the feet, and engage the quadriceps (by lifting your knee cap) to keep your knees from locking.
- Lean forward slightly and place your hands on the mat.
- With every inhale, feel your spine growing longer (imagine the crown of your head reaching out in front of you to the wall); with every exhale, allow the body to sink lower (the chest is getting closer to the floor).
Child’s Pose

- Sit on the floor with your legs folded underneath themselves. Lower your chest to the floor.
- Your belly will rest on or between your thighs, and your forehead will reach towards the mat. (Place a towel under your forehead if it won’t reach the floor.
- Stretch the arms out in front of you to feel a stretch up the length of the back.
- Stretch the arms alongside the body, with the fingertips facing the toes, to stretch between the shoulder blades.
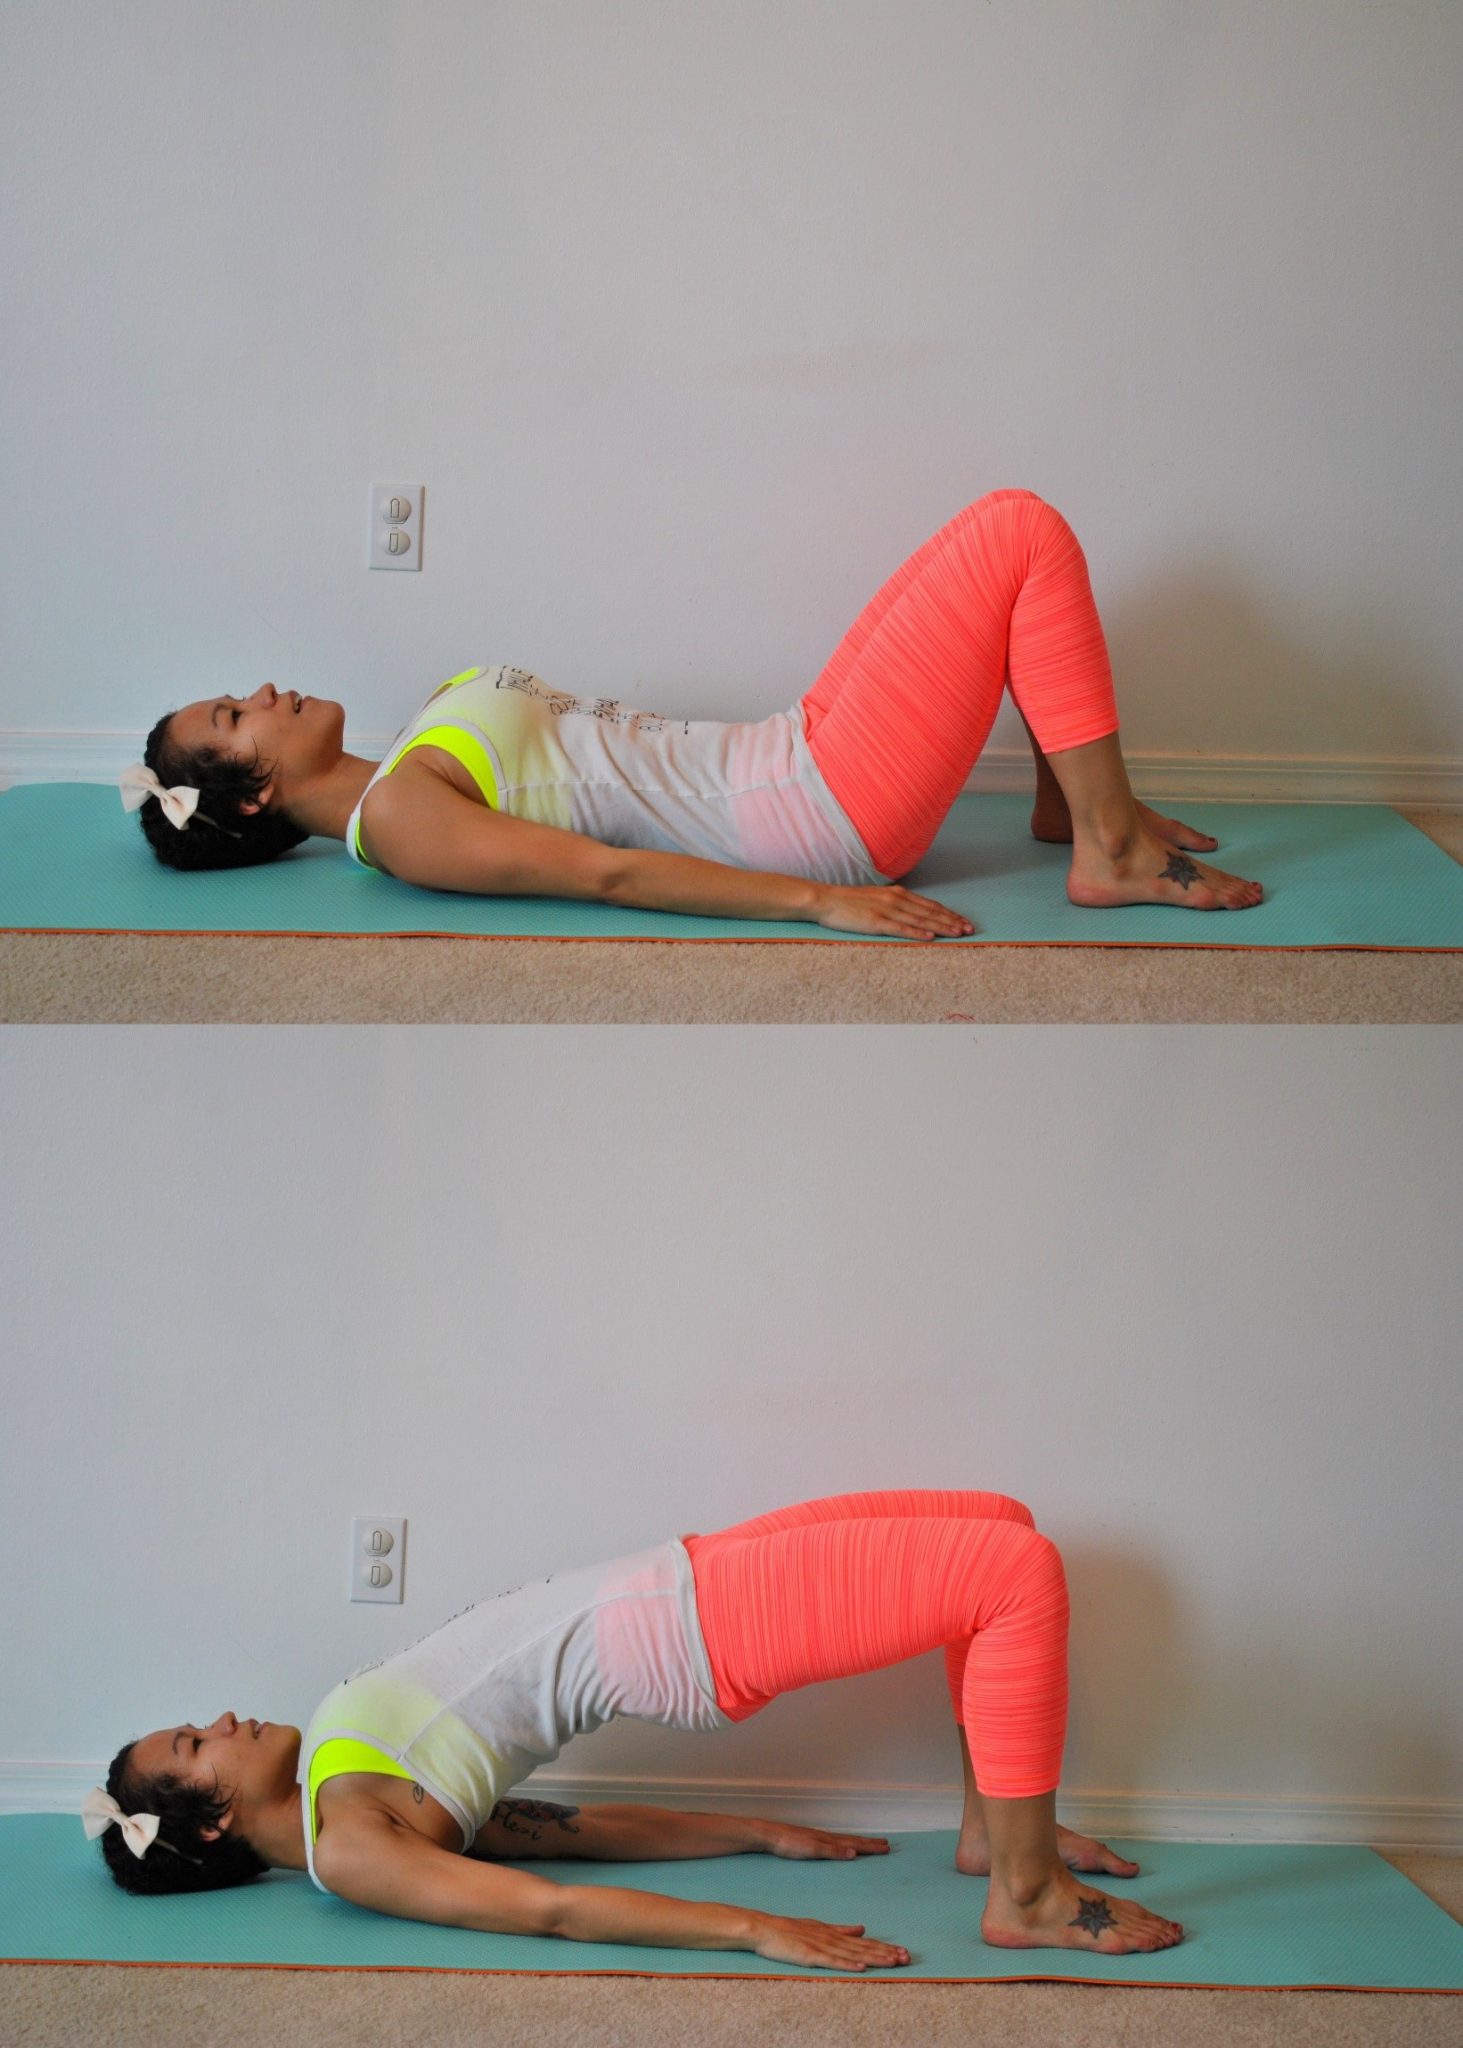
Legs Up the Wall Pose

- Sit next to a wall and lie onto your back, bringing your knees into your chest.
- Place your legs on the wall while wiggling your bottom closer to the wall.
- Allow your heels to rest gently on the wall. You may place your legs together or apart, whichever feels most comfortable.
- Extend the arms overhead for an added stretch.
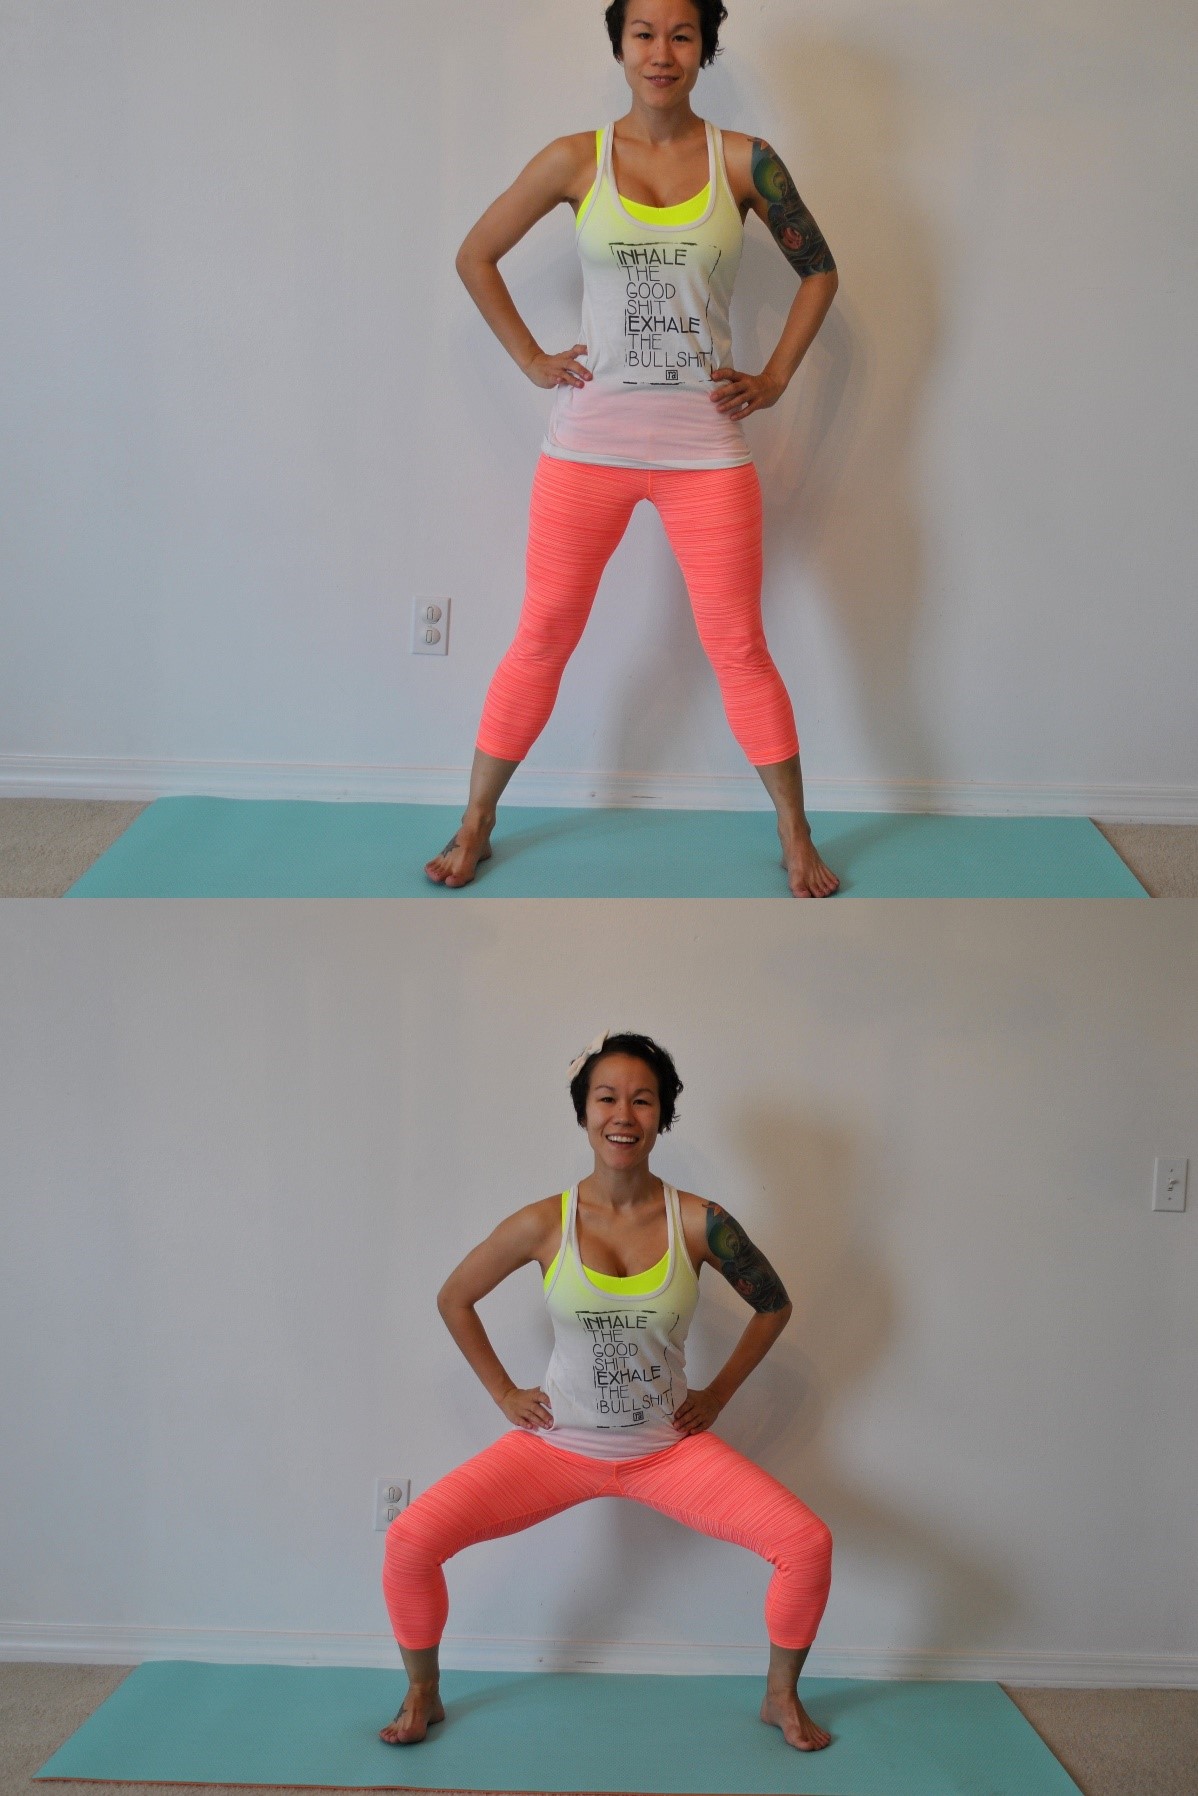
Standing Wide Legged Forward Fold

- Turn to the right and step your feet about a leg’s length apart.
- Turn your heels slightly out and your toes slightly in. (Imagine you’re slightly pigeon-toed.)
- Inhale, stand tall and stretch your arms out to a T.
- Exhale, fold forward, taking your hands to the floor or a yoga block. Allow your head to hang down, straightening your spine. Gaze past the end of your nose.
- After five breaths, inhale as you roll up slowly, engaging your abs and pressing in to your feet to help you rise.
- Exhale, step your feet together.
Garland Pose
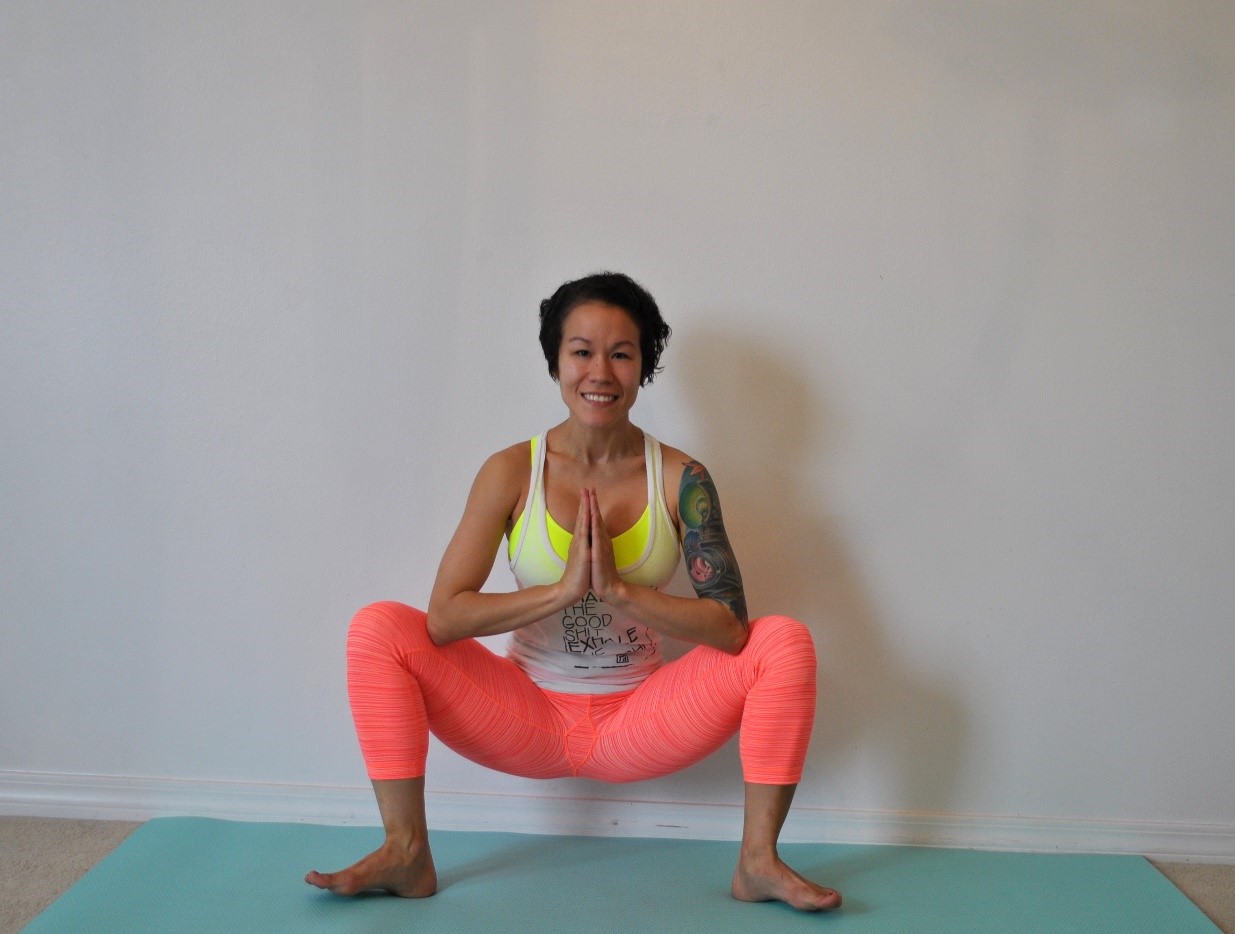
- This pose is so effective for opening the hips that it’s the position most women use to give birth.
- Turn your heels so they line up with your hips, turn your toes outward. Bend the knees until you reach a squatted position.
- Place a blanket under the heels if they have to be lifted while squatting.
- You can also stack two yoga blocks to sit on to work up to the full integrity of the pose.
- The Garland Pose increases fluidity in the hips, and stretches the ankles, knees, and lower back. It also strengthens the core muscles.
The Workout Plan
Alright, ladies! Now that we have been through the anatomy & physiology of the gluteal muscles as well as the principles of building a better butt, let’s get to the real deal: the workout plan!
We already know by now that the perfect formula for your best butt ever is a clean diet, low in sugar and trans fats, and exercise (cardio + strength training)
So let’s talk cardio real quick. Cardio is wonderful and essential for burning fat and getting rid of stubborn cellulite. However, if you are looking to build a booty or add shape, don’t let cardio be your PRIMARY go-to. Use it as a way to begin your workout by doing a few minutes or do cardio 2-3 times per week in addition to lifting and stretching.
Now, I am not sure what your day-to-day schedule is like, but if you have the time, set aside at least 30 minutes (ideally 45 minutes) daily for your workouts. This might mean setting the alarm for an hour earlier or fitting something in during your lunch break at work. I have learned that if you want it badly enough, you will make the time. If there’s a will, there’s a way.
Below, is a one week fitness plan filled with nothing but booty-building, body-weight only exercises. You can do these moves anywhere and at any time! However, for maximum results, it would be best to use a weight such as a medicine ball, kettlebell, ankle weights, or dumbbells for each move (if applicable).
You will follow the following this one week plan for 4 weeks. “Why 4 weeks?” you may wonder. Well, science has proven that it takes at least 21 days to form a habit. I added another week to secure yourself into the routine so that you will be able to figure out what works best for you to continue throughout the rest of your life.
YES. Working out should be a part of your life-not just for 1,2,4,6, or 8 weeks. A workout program is not a one-time thing-it simply shows you the way to lead your active lifestyle.
To track your progress, I encourage you all to take body measurements and to take before photos. I would love to share your photos on the blog! My biggest tip for taking before photos is using the SAME outfit and the SAME body position in both your before AND after photos. Have someone take photos of you every two weeks so that you can literally see your transformation in the making. This will give you lots of motivation to keep going to reach your goal!
Here’s what to do:
- Get naked. Yes, naked is best since clothes can actually add inches to your body. If you do not want to get naked, try a bathing suit or thin clothing.
- Measure the main key parts of your body using a measuring tape. But remember to not pull the tape very tightly-it should just fit snug. Pulling two tightly can offer inaccurate results.
- When taking the circumferences, always measure at the widest points.
- Relax your entire body. This is not the time to pose, flex, or suck it all in. Just relax. We need to know what you truly are at.

Now, here is what to measure:
Bust: Measure the chest right at the nipple line, but again, don’t pull the tape to tight.
Chest: Measure just under your bust. Some people even prefer to measure above the bust.
Waist: Measure a half-inch above your belly button or at the smallest part if your waist
Hips: Stand with feet together & Place the tape measure around the widest part.
Thighs: Measure around the widest part of each thigh.
Arms: Measure around the widest part of each upper arm.
Calves: Measure around the widest point of each thigh.
Ready… Set… GO!!!
Build a Better Butt Workout Plan

++ Safety, First ++
CAUTION: Before beginning any exercise program, please check with your doctor for approval first and foremost. This program is NOT recommended for pregnant women.
Please discontinue this workout if:
- You feel dizzy, faint, or lightheaded.
- Have any type of pain or discomfort.
- Are pregnant or could be pregnant.
- Have any medical conditions that could worsen from pro-longed exercise.
- Have any old injuries that could be exacerbated from pro-longed exercise.
***If you find yourself having difficulty performing a new move or exercise, DO NOT push yourself. Instead, you may substitute the move for a more knowledgeable move that is safer for you to do or skip the move altogether.
++ Monday +
Warm up: 10 minutes of Glute Stretches mentioned in Chapter Two.
Sumo Squats: 3 sets of 10 repetitions
- Stand with feet roughly twice wider than shoulder-width apart with toes turned out. (Think of a sumo wrestler.)
- Keeping abs tight and torso tall, bend knees 90 degrees, keeping knees aligned.
- Press back to start; squeeze your glutes.
*For a more advanced workout, hold a medicine ball, dumbbell, or kettlebell at your waist as you go down*
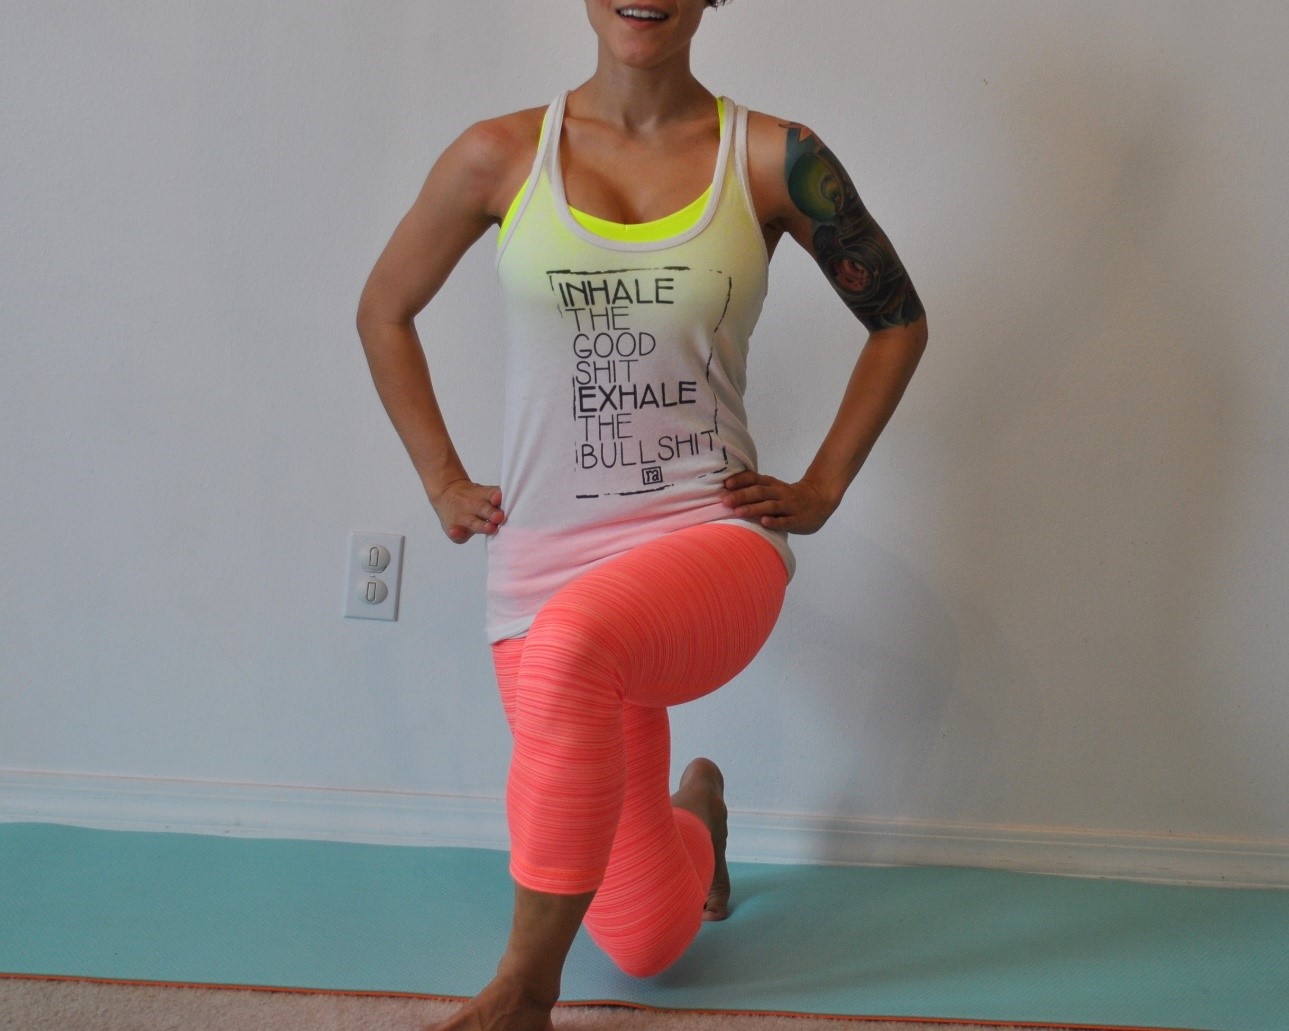
Walking Lunges: 3 sets of 10 repetitions

- Step forward with first leg.
- Land on heel, then forefoot.
- Lower body by flexing knee and hip of front leg until knee of rear leg is almost in contact with floor.
- Stand on forward leg with assistance of rear leg.
- Lunge forward with opposite leg.
- Repeat by alternating lunge with opposite legs.
*For a more advanced workout, hold a medicine ball, dumbbell, or kettlebell at your waist as you lunge walk. I love strapping my baby to my chest and using him as a weight!*
Donkey Kicks: 3 sets of 10 repetitions

- Start on all fours, with your hands directly under your shoulders and your knees directly under your hips.
- Keep your right knee at a 90-degree angle as you slowly raise your leg behind you until your thigh is almost parallel to the floor. Pulse your flexed foot toward the ceiling by squeezing your glutes. Your back should remain perfectly still in a neutral spine. The motion should be small and controlled with the muscle doing the work and not momentum.
- Return to start position to complete one rep.
*For a more advanced workout, hold a dumbbell at the bend of your knee as you complete this move*
High Knees: 3 sets of 10 repetitions

- In basic high knees, you need to stand still with your feet hip-width apart.
- Pull your right knee towards your chest and keep it there for 3 seconds.
- Now move it back to the original position and then repeat the step.
*For a more advanced workout, use ankle weights*
Cool Down: 15 minute walk or jog.
++ Tuesday ++
Warm up: 10 minutes of Glute Stretches mentioned in Chapter Two.
Knee Tuck Extensions: 3 sets of 10 repetitions

- On all fours, lift one leg straight out behind you into the air so that you feel the burn in your glutes.
- Then, bring that same leg up and in so that your knee almost touches the elbow of the same side of the body.
Mountain Climbers: 3 sets of 10 repetitions

- Place hands on floor, slightly wider than shoulder width.
- On forefeet, position one leg forward bent under body and extend other leg back.
- While holding upper body in place, alternate leg positions by pushing hips up while immediately extending forward leg back and pulling rear leg forward under body, landing on both forefeet simultaneously.
Reverse Plank: 3 sets of 10 repetitions
- Sit on the floor with your legs extended in front of you.
- Place your palms, with fingers spread wide, on the floor slightly behind and outside your hips.
- Press into your palms, and lift your hips and torso toward the ceiling.
- Look up to the ceiling, point your toes, and keep your arms and legs straight.
- Keep your entire body strong, and form a straight line from your head to your heels.
- Squeeze your core and try to pull your belly button back toward your spine.
- If your hips sag or drop, lower yourself back to the floor.
- The goal is to maintain a straight line and hold for 20 to 30 seconds. You may need to begin by holding the position for only a few seconds as you build your strength. It’s better to hold the correct position for a shorter time than to go longer in an incorrect position.
Inner Thigh Lifts: 3 sets of 10 repetitions

- Lying on your side, lengthen your bottom leg, and cross your top leg over.
- Prop your head up with your hand, or rest your head on your arm.
- Work in side-lying neutral to keep your torso steady, and concentrate the work in your inner thigh rather than allowing your back to create the motion.
- As you exhale, lift your bottom leg, and inhale as you lower it back down without letting it touch the floor. Your torso should stay still while you do this. This counts as one rep.
*For a more advanced workout, use ankle weights*
Cool Down: 15 minute walk or jog
++ Wednesday ++
Warm Up: 10 minute Sprint/Jog Intervals
- Using a timer, sprint for one minute, jog the next minute for ten minutes total.
20 minutes of yoga: Glute-Building Yoga Poses from Chapter 2.
- Complete the round of yoga moves for thirty minutes.
Cool Down: 10 Minute Walk/Jog Intervals
- Using a timer, walk for one minute, jot the next minute for 10 minutes total.
++ Thursday ++
Warm up: 10 minutes of Glute Stretches mentioned in Chapter Two
Side Plank: 3 sets of 30 seconds

- Lie on side on mat.
- Place forearm or hand on mat under shoulder perpendicular to body
- Place upper leg directly on top of lower leg and straighten knees and hip.
- Raise body upward by straightening waist so body is ridged. Hold position. Repeat with opposite side.
Glute Bridges: 3 sets of 10 repetitions
- Lie face up on the floor with your knees bent and your feet flat on the floor.
- Raise your hips so your body forms as straight line from your shoulders to your knees.
- Pause in the up position, then lower your body back to the starting position.
*For a more advanced workout, hold a medicine ball, kettlebell, or barbell on top of your torso*
Side Lying Leg Raises: 3 sets of 10 repetitions

- Lie face down with head resting on hands.
- Keeping hips to the floor lift right leg. Hold momentarily.
- Then return to start under control. Repeat set with left leg.
*For a more advanced workout, add ankle weights*
Cool Down: 15 minute walk or jog
++ Friday ++
Warm up: 10 minutes of Glute Stretches mentioned in Chapter Two
Leg Scissors: 3 sets of 10 repetitions

- Lie face-up on a mat with your hands under your butt or out to the sides.
- Raise your legs up to about a 90 degree angle or so and begin “scissoring” one leg after the other, up and downward.
*For more of an advanced workout, use ankle weights*
Fire Hydrants: 3 sets of 10 repetitions

- Place your body on an all-fours position. Elbows should be slightly bent.
- Back should be parallel to the ground, not arched or swayed downward.
- Keeping the kneeling position raise left leg out to the side, parallel to the ground. Maintain for a second and slowly return to the initial position.
- Repeat movement with same leg until set is finished. Repeat the exercise using the right leg.
*For a more advanced workout, use ankle weights*
One-Legged Glute Bridges: 3 sets of 10 repetitions

- Lay on the floor with your feet flat and knees bent.
- Raise one leg off of the ground, pulling the knee to your chest. This will be your starting position.
- Execute the movement by driving through the heel, extending your hip upward and raising your glutes off of the ground.
- Extend as far as possible, pause and then return to the starting position.
*For a more advanced workout, use ankle weights or hold a medicine ball on your torso*
Cool Down: Take a 15 minute walk or jog.
++ Saturday ++
Warm up: Glute Stretches from Chapter 2.
Squat Jumps: 3 sets of 10 repetitions

- Stand with your feet shoulder-width apart.
- Start by doing a regular squat, then engage your core and jump up explosively.
- When you land, lower your body back into the squat position to complete one rep. Land as quietly as possible, which requires control.
*For a more advanced workout, use ankle weights*
Lunge Kicks: 3 sets of 10 repetitions

- Start with your feet together and your hands on your hips.
- Take a long step back with your right leg, and lower your hips into a lunge. Be sure your back knee is pointing directly toward the floor and your front knee is aligned with your ankle.
- Push off with your right foot to lift your body into standing position.
- Then lift your right knee no higher than hip level.
- Slowly extend right leg forward. Keep your abdominals fully engaged, and avoid arching your lower back.
- Pause and step back into lunge position.
*For a more advanced workout, use ankle weights or hold a medicine ball at your torso while kicking*
Crossover Lunges: 3 sets of 10 repetitions
- Stand with your hands by your sides.
- Step forward and cross over the stationary leg.
- Perform a lunge. You should feel the stretch in the hips. Repeat the exercise for several repetitions.
*For a more advanced workout, hold a medicine ball, dumbbell, or kettlebell at your waist as you go down*
Cool Down: Take a 15 minute walk or jog.
++ Sunday ++
Warm Up: 10 minute Sprint/Jog Intervals
- Using a timer, sprint for one minute, jog the next minute for ten minutes total.
20 minutes of yoga: Glute-Building Yoga Poses from Chapter 2.
- Complete the round of yoga moves for thirty minutes.
Cool Down: 10 Minute Walk/Jog Intervals
- Using a timer, walk for one minute, jot the next minute for 10 minutes total.
This completes your workout series.
I wish all of you ladies a happy transformation to getting your best butt ever! If you have any questions regarding the series or to send me your before and afters please feel free to contact me at diaryofafitmommy@yahoo.com.
Now go and get your best booty ever! You deserve it.
**BONUS**
Here is a perfect butt scrub to use once or twice weekly while in the shower! The “caffeine” in the coffee works on the skin in three primary ways: as a vasoconstrictor, an antioxidant, and a diuretic, making it perfect for buffing your skin to reduce the appearance of cellulite.
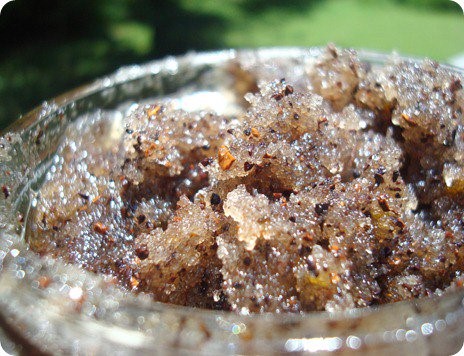
Ingredients
- 2 cups Coffee Grinds
- 1/2 cup Sea Salt
- 1/4 cup Raw Honey
- 4 tbsp. Coconut Oil
- An exfoliating glove or dry brush (very helpful, but optional)
Directions
- Mix ingredients in a bowl.
- Massage the scrub into your skin in a circular motion for 5 minutes per butt-cheek. You may also use a dry brush as well.
- Store in an air tight container and keep in the shower for future use
If you cannot make it to a gym and need to workout from home, try my new Strong Body Guide that is helping busy women worldwide get into their best shape ever. Little to no equipment needed for most moves!
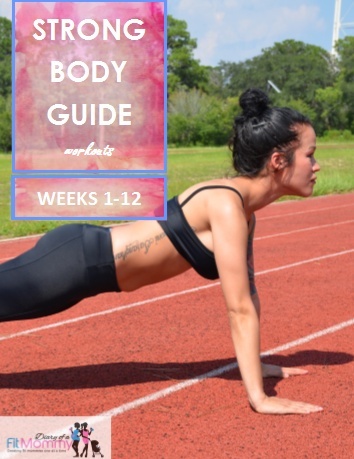
In this guide, you can expect:
– ✅ 12 weeks of workouts that can be done at home with little to no equipment.
– ✅ 225 pages long
– ✅ Each workout takes less than 30 minutes-great for busy schedules.
– ✅ step by step instructional picture examples of every move
– ✅ no gym required
– ✅ exercises focus on hiit, strength training, and plymetrics
– ✅ download on any device
– ✅ build a lean tone stomach, butt, thighs, and arms
– ✅ download instantly from anywhere
– ✅ promote fat loss & boost metabolism
– ✅ contains cardio and stretching routines as well!
– ✅ full exercise glossary with images and instructions for every move
*All guides are digital ebooks available instantly worldwide. Compatible on all devices – Android, iPhone, iPad, Kindle, Nook, Computer, Mac.
Your trainer and friend,


